Overview
This guide covers managing user roles and permissions in MinuteDock, including creating and assigning roles, configuring permissions, and setting billing rates. It also explains how to organize teams with roles and run reports or set goals based on roles.
Adding and Removing Users
Adding Users
- How to Add:
- Click the Add a new user button in the Account tab, under the team section.
- Enter the email/name of the new user and issue invite.
- On the next page you can set their user permissions and default rate.

Removing Users
- How to Remove:
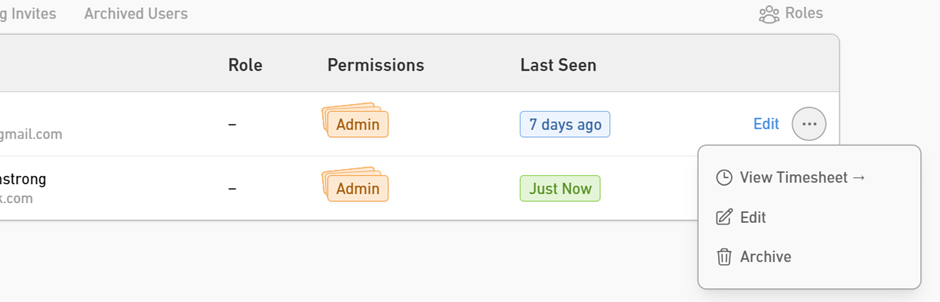
- Click the '...' button on the right side of the table.
- Select Archive User from the options. This action doesn’t remove data and can be restored anytime.
User Permissions
Admin Users
- Capabilities: Admin users have full access, including adding/editing users, projects, tasks, contacts, hourly rates, and invoices.
- Time Tracking: Admins can track time on behalf of other users.
- Manage Admin Status: Admins can make other users admins as needed.
Regular Users
- Capabilities: Regular users can log time and see reports of their own time but have limited permissions compared to admins.
- Hourly Rates: Regular users cannot see hourly rates unless granted permission to manage contacts or projects/tasks linked to those rates.
Checking User Permissions
- Admin Status: Go to the Account tab to see if a user is an admin (Admin in the Permissions column).
- Basic: Indicates a user with only minimal permissions enabled.
- Invoicing/Reporting: Indicates a user with some permissions enabled, but not full admin status.
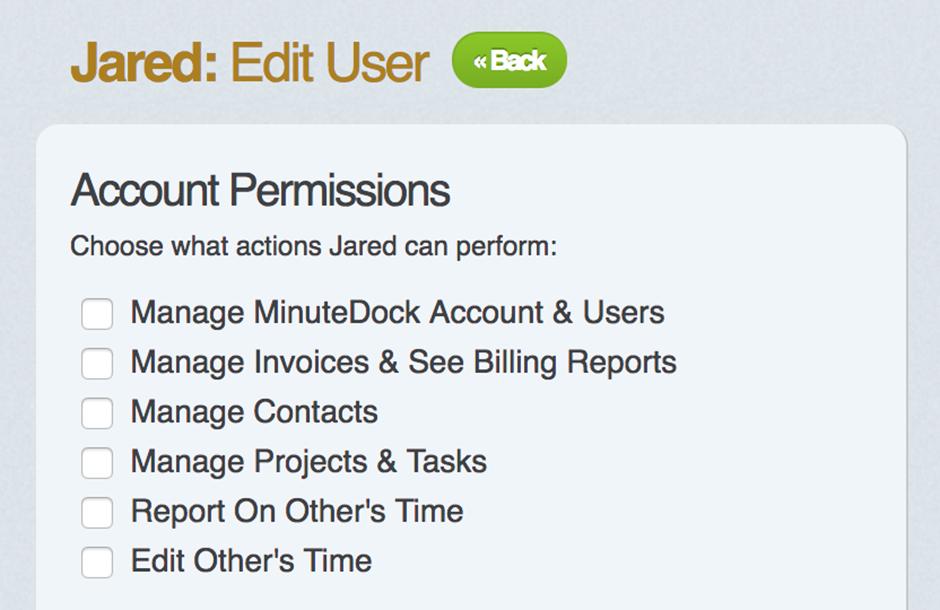
Managing User Permissions
- Go to the Account page.
- Enter the Team section.
- Click Edit next to the user's name.
- Select/deselect permissions as needed.
- Click Update to save changes.
Editing Personal Details

- Profile Updates: Each user can update their own profile, including name, email, time zone, preferences, and password, through the Profile tab.
- Nobody other than the user themselves can update their profile information.
Client and Project Access
Limiting Client Access
- Default Access: New users can see all contacts but cannot add/edit them.
- Limit Access:
- Go to the Account tab.
- Click Edit next to the user.
- Click More options to show additional settings.
- Under Allowed Contacts, select/deselect contacts the user can access, restricting project access as well.
- Click Update to save changes.

User Permission Descriptions
Manage MinuteDock Account & Users
- Admin Rights: Converts a regular user into an admin, showing the Account tab and allowing full management of users.
Manage Invoices
- Invoice Permissions: Allows viewing, creating, editing, and sending invoices, and viewing all time entries and hourly rates.
Manage Contacts
- Contact Permissions: Allows viewing, adding, and removing contacts and viewing hourly rates.
Manage Projects & Tasks
- Project/Task Permissions: Allows viewing, adding, and removing projects and tasks and viewing hourly rates.
Report on Others’ Time
- Reporting Permissions: Allows viewing other users’ time entries and creating comprehensive reports.
Edit Others’ Time
- Editing Permissions: Allows editing time entries and goals of other users and tracking time on their behalf.
Organizing with Roles
Roles Overview
- Purpose: Roles help organize users based on their business position, managing billing rates, invoicing details, integration settings, and user permissions.
Creating & Managing Roles
- Access the Team screen in Account settings.
- Click the Roles tab on the right.
- Click Add a Role to create a new role.
- Configure role elements such as name, permissions, billing settings, and integrations.
- Click Create Role to finalize.

Assigning Roles to Users
- Navigate to the Team screen.
- Edit the relevant user.
- Assign a role from the available list.
Running Reports Against Roles
- Role-Based Reports: Use the Reports screen to filter time tracked by users with specific roles.
Role-Specific Billing Rates
- Configuration: Set role-specific rates for contacts, projects, or tasks by editing their billable settings.
- Precedence: User-specific rates override role-specific rates.
Creating Goals/Targets with Roles
- Goal Filtering: Filter goals using roles, with any user in the role contributing to the goal.
User Permissions vs. Role Permissions
Permission Priority
- Either-Or Basis: Permissions enabled in either user settings or role settings grant access. Both must be disabled to restrict a user.